
Advertisement
What Is a Custom Water Texture Pack (and Why Does It Matter)?

A custom water texture pack is a resource pack that replaces Minecraft’s default water appearance with new visuals — changing how still water, flowing water, and underwater areas look in your world.
Quick answer for what a custom water texture pack does:
- Replaces
water_still.pngandwater_flow.pngin your game’s assets - Can make water clearer, more colorful, animated, or ultra-realistic
- Works on both Java Edition and Bedrock Edition
- Some packs also change water color by biome using OptiFine or Bedrock’s Vibrant Visuals
Here’s what most packs focus on:
| Pack Style | What It Changes |
|---|---|
| Clear Water | Makes water transparent so you can see the ocean floor |
| Realistic Water | Adds detailed wave patterns and reflections |
| Animated Water | Smooth looping animations for flowing and still water |
| Biome-Specific | Adjusts water color per biome (swamp, ocean, jungle, etc.) |
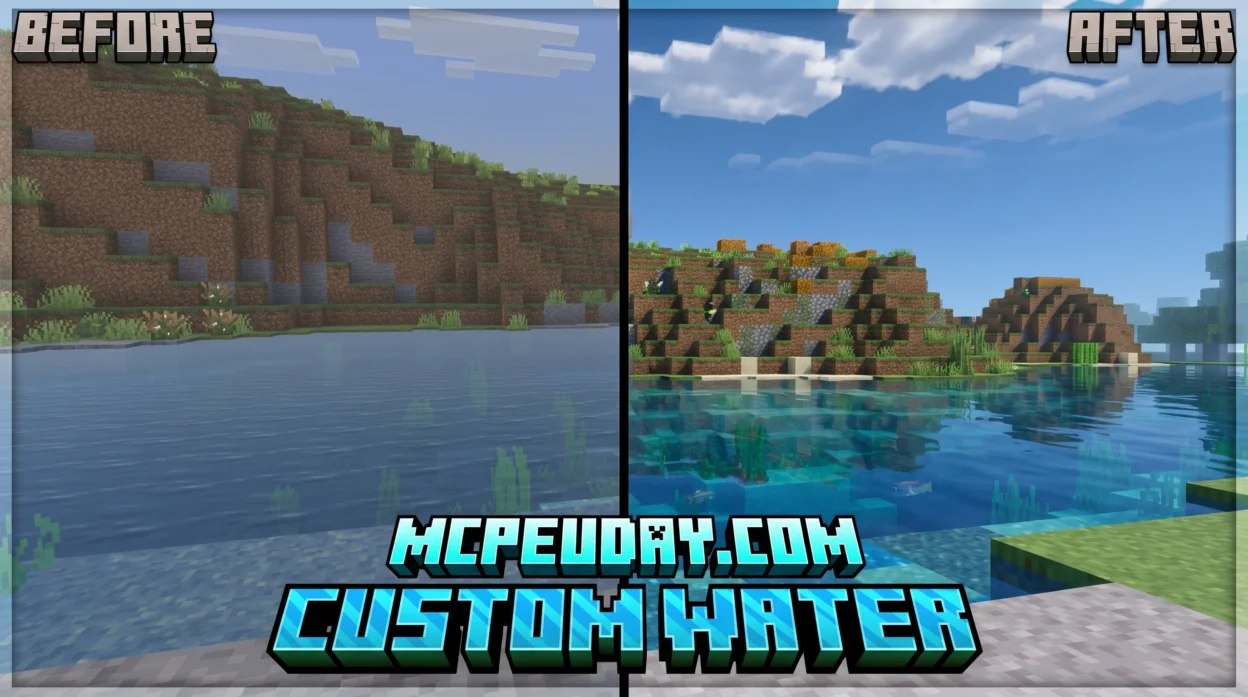
Minecraft’s default water has always been a bit… flat. It’s functional, but it doesn’t exactly scream immersive. That’s why water texture packs are some of the most downloaded resource packs out there — with top packs pulling in hundreds of thousands of downloads on platforms like CurseForge and Planet Minecraft.
Whether you want crystal-clear ocean water, dark swamp murk, or a glowing animated river, a custom water texture pack is one of the fastest ways to upgrade how your Minecraft world looks without touching a single line of code.
This guide covers everything: building your own pack from scratch, setting up the right files, fixing common errors, and finding the best ready-made packs available right now.

Anatomy of a Custom Water Texture Pack
To create or modify a custom water texture pack, we must first understand how Minecraft reads water files. Unlike standard blocks like dirt or cobblestone, water is dynamic. It flows, ripples, and changes colors based on where you stand.
At its core, a water texture pack relies on a specific file hierarchy, two primary image files, and their corresponding metadata files.
In vanilla Minecraft, water is rendered using two primary textures:
water_still.png: The texture used when water is stationary (e.g., in a lake or a filled bucket).water_flow.png: The texture used when water is moving (e.g., a waterfall or a spreading stream).
Because water is animated, these files are not simple square images. Instead, they are “strip” textures containing multiple animation frames stacked vertically. If your texture resolution is 16×16 pixels, and your animation has 32 frames, your final PNG file will be 16 pixels wide and 512 pixels tall (16 x 32 = 512).
To tell Minecraft how to play these frames, we need .mcmeta files. For a deeper look at how these assets come together in real-time, you can check out this Minecraft – Custom Water and Lava Textures! (Resource Pack Tutorial).
Setting Up Your Custom Water Texture Pack Folder Structure
Before we open any image editor, we need to build the directory skeleton. If a single folder is misplaced or misspelled, Minecraft will ignore our custom textures entirely.
Here is the exact folder structure required for Java Edition (using Minecraft 1.21 as our baseline):
MyCustomWaterPack/
├── pack.mcmeta
├── pack.png
└── assets/
 └── minecraft/
 └── textures/
 └── block/
 ├── water_still.png
 ├── water_still.png.mcmeta
 ├── water_flow.png
 └── water_flow.png.mcmeta
Let’s break down these files:
pack.mcmeta: This is the metadata file that identifies your folder as a resource pack. It contains the pack’s format version and description.pack.png: A 64×64 or 128×128 PNG image that acts as the icon for your resource pack in the game menu.assets/minecraft/textures/block/: This is the exact directory path where Minecraft looks for block textures. If you place your water files in anentityoritemfolder by mistake, the water will render as the infamous purple-and-black checkerboard!
If you want to see a clean example of a modern, minimalist layout, you can download the Bare Bones Texture Pack 1 21 Mcpe Bedrock Edition Download Now to inspect its clean file structure.
Configuring waterstill.png and waterflow.png
Once your folders are set up, we must configure the actual texture files and their .mcmeta animation instructions.
The .mcmeta files must be named exactly after their corresponding texture files, with .mcmeta appended to the end:
water_still.png.mcmetawater_flow.png.mcmeta
Inside these files, we write a simple JSON script that dictates the animation speed and whether the frames should blend smoothly. Here is a standard configuration for water_still.png.mcmeta:
{
  "animation": {
 "frametime": 2,
 "interpolate": true
  }
}
frametime: The duration each frame is shown. A lower number makes the animation run faster.interpolate: When set totrue, Minecraft will generate transition frames between your actual frames, creating a much smoother, flowing visual effect. This is highly recommended for realistic or stylized water packs!
To explore more pre-configured block layouts and styles, Explore Custom Textures on MCPEUDAY.
Step-by-Step Guide to Creating a Custom Water Texture Pack
Now that we have our files organized, let’s look at how we actually design the textures.

Creating a water texture is unique because water is semi-transparent. When designing in editors like Photoshop, GIMP, or Aseprite, you must work with the image’s opacity (alpha channel). If your texture is 100% opaque, your water will look like solid blue plastic. If it is too transparent, the water will be practically invisible.
To start designing:
- Open your image editor and create a canvas. For a standard 16×16 resolution with 32 animation frames, your canvas size should be 16×512 pixels.
- Divide your canvas into equal square grids (each 16×16 pixels).
- Draw your water ripples in each frame, shifting the lines slightly downward or outward in each progressive frame to simulate movement.
- Set the layer opacity to around 40% to 60% so players can see through the water.
- Save your file as a transparent PNG.
To kickstart your creation process, you can Get Started with Minecraft Texture Packs to learn the basics of editing block maps.
Designing a Custom Water Texture Pack for Modern Minecraft Versions
In modern versions of Minecraft like 1.21, creators are no longer limited to low-resolution pixel art. You can design packs in 32×32, 64×64, or even ultra-high-definition PBR (Physically Based Rendering) formats.
PBR textures use advanced lighting maps to react dynamically to light sources in the game. To achieve this, creators use specialized map channels:
- Albedo Map: The base color and transparency of the water.
- Normal Map: Simulates physical depth, making ripples and waves catch light realistically.
- Roughness Map: Dictates how shiny or matte the water surface is.
If you are looking for visual inspiration for darker, more atmospheric textures, the Dark Souls Visuals Texture Pack 26 X 1 21 Mcpe Bedrock Texture Pack is an excellent example of using deep colors and custom mapping to create a moody environment.
For those interested in 3D modeling and rendering water outside of Minecraft, high-quality resources like the Seamless PBR stylized flowing water surface texture, the 4K PBR Seamless Water Surface Texture with Reflective Ripples, the vibrant Seamless PBR Water Texture with Pink and Blue Reflective Waves, and the beautiful Seamless PBR stylized turquoise sea water texture showcase how professional artists structure their water maps.
Creating Seamless and Animated Water Textures
The biggest challenge when making a custom water texture pack is ensuring that the edges of your textures tile seamlessly. If the left edge of your texture doesn’t match the right edge, you will see ugly lines running through your rivers and oceans.
To prevent this:
- Use offset filters in your image editor to wrap the edges of your texture while designing. This allows you to paint over the seams directly.
- Use procedural tools like the Free Water Texture Generator – Caustic & Underwater Patterns | Texturize. These generators use wave interference algorithms to produce perfectly tileable water caustics and ripples, which you can easily convert into Minecraft-compatible animation strips.
Once you have your seamless frames, arrange them vertically and configure your .mcmeta file to loop them smoothly. To discover more tools and packs that help Enhance Your Minecraft Visuals, check out our dedicated graphics section.
Advanced Customization: Biomes, Shaders, and Popular Packs
If you want to take your water customization to the next level, you need to look beyond static textures.
In vanilla Minecraft, water colors are dynamically adjusted by the game’s engine based on the biome you are in. Swamps have murky green water, while warm oceans feature a bright turquoise hue. Because these biome color maps are hardcoded, a standard resource pack cannot change them directly.
However, if you use OptiFine or similar optimization mods, you can bypass this limitation. By creating a colors.properties file inside your resource pack (placed in the assets/minecraft/optifine/ folder), you can define custom color hex codes for every biome in the game!
If you’re looking to modify other environmental rules—such as making blocks transparent to locate resources easily—you might also be interested in our X Ray Texture Pack For Minecraft Pe Mcpe 1 21.
Customizing Water in Bedrock Edition with Vibrant Visuals
For our Bedrock Edition players, customizing water is handled a bit differently. Thanks to Bedrock’s engine and features like Vibrant Visuals, you can customize water behavior and rendering using a dedicated JSON file named water.json located within your resource pack’s water/ directory.
Using the minecraft:water_settings schema (format version 1.26.0), you can adjust parameters like:
- Particle Concentrations: CDOM (yellow-brown), chlorophyll (green), and suspended sediment (red-brown) to procedurally generate muddy rivers or pristine pools.
- Waves: Control wave frequency, speed, and octaves (though these are image-based overlays and do not alter physical block geometry).
- Caustics: Add vertically-stacked sprite sheets to project shifting light patterns onto the ocean floor.
biome_water_color_contribution: A value between0.0and1.0that determines how much the biome’s native surface color blends with your custom particle-based water settings.
Version Differences and Shader Integration
When downloading or creating water packs, keep in mind that file structures changed significantly between older versions (like 1.12.2) and modern versions (like 1.21).
- In older versions, OptiFine configurations were stored in the
mcpatcherfolder. In modern versions, this folder must be renamed tooptifine. - Pack format numbers in your
pack.mcmetamust match your game version (e.g., format3for 1.12.2, format34for 1.21).
If you plan to use shaders, look for packs that include custom normal and specular maps. Shaders use these maps to create realistic reflections, sun glares, and wave distortions. For a stunning example of how to make your world glow with advanced lighting, check out the Glowing Plus Texture Pack Make Your Minecraft World Shine With Brilliant Light Effects.
Top-Rated Water Resource Packs and Community Favorites
If you’d rather download a high-quality water pack created by the community, there are thousands of incredible options available. On CurseForge alone, there are over 2,145 resource packs tagged under ‘water’, while Planet Minecraft hosts hundreds of highly rated designs.
Here is a comparison of some of the most popular water-focused resource packs available:
| Resource Pack Name | Platform | Download Count | Main Visual Feature |
|---|---|---|---|
| Water Improved | CurseForge | ~882.8K | Enhanced clarity, smoother animations, natural hues |
| Environmental Water | CurseForge | ~594.6K | Biome-specific color balancing and realistic flow |
| Clear Lava and Water | CurseForge | ~550.9K | High transparency for both water and lava hazards |
| Old Lighting & Water | CurseForge | ~209.2K | Restores classic Alpha/Beta style water visuals |
| Better Clear Water | CurseForge | ~126.6K | Optimized clean water for underwater exploration |
| Clear Water | Planet Minecraft | ~124.5K | Minimalist transparent water textures |
| Accurate Textures | Planet Minecraft | ~71.9K | Realistic, high-resolution water surfaces |
| Clearer Water | Planet Minecraft | ~36.1K | Lightweight transparency tweak for low-end PCs |
To grab these and other incredible community creations, you can Download Water Texture Packs on MCPEUDAY. You can also search the directories directly on the CurseForge Water Resource Packs Page or explore the community submissions on the Planet Minecraft Water Texture Packs Tag.
(Fun note: If you play other classic games, you can see how other communities handle water assets by visiting the Call of Duty 5: Custom Water Textures Wiki or checking out community creations like Nikolai’s Water Retexture on the Steam Workshop.)

Frequently Asked Questions about Water Textures
Why is my custom water texture showing as a purple and black checkerboard?
This is Minecraft’s default “missing texture” fallback. It usually happens for three reasons:
- Incorrect File Path: You placed your files in the wrong folder (e.g.,
textures/blocksinstead oftextures/block). - Missing or Broken
.mcmetaFile: Minecraft is trying to animate the water but cannot find the matching.mcmetafile, or the JSON code inside has a syntax error. - Mismatched Dimensions: Your PNG file’s height is not a perfect multiple of its width.
Can I change water biome colors without using mods like OptiFine?
In Java Edition, water biome color maps are hardcoded into the client and cannot be changed using standard resource packs without OptiFine or fabric mods. However, in Bedrock Edition, you can modify biome colors directly using custom client_biome.json configurations or by editing the water.json settings under Vibrant Visuals.
How do I make my custom water texture look completely clear?
To make water completely clear, open water_still.png and water_flow.png in your image editor, select all pixels, and lower the layer opacity (alpha channel) to around 5% to 10%, or erase the texture entirely while keeping a very subtle ripple border.
If you want a professional-grade realistic pack that handles transparency beautifully alongside high-definition textures, we highly recommend trying the Realsource Realistic Pack Mcpack.
Conclusion
Customizing your water is one of the most rewarding ways to refresh your Minecraft experience. Whether you are building a custom map, searching for resources underwater, or just want a more beautiful world to explore, a custom water texture pack makes a massive difference.
At MCPEUDAY, we love sharing resources that help you push the visual boundaries of your game. From simple clarity tweaks to advanced shaders, there is a whole world of customization waiting for you.
Ready to transform your world? Explore more Minecraft texture packs on our site and find the perfect look for your next adventure!

[…] Custom Water Texture Pack 26 x 1 21 MCPE Bedrock Texture Pack […]
[…] hardware limits. If you are customizing Minecraft, you might want to look at options like the Custom Water Texture Pack 26 x 1 21 Mcpe Bedrock Texture Pack to see how custom water colors and animations can transform your blocky worlds without lagging your […]